

What Is This Tool?
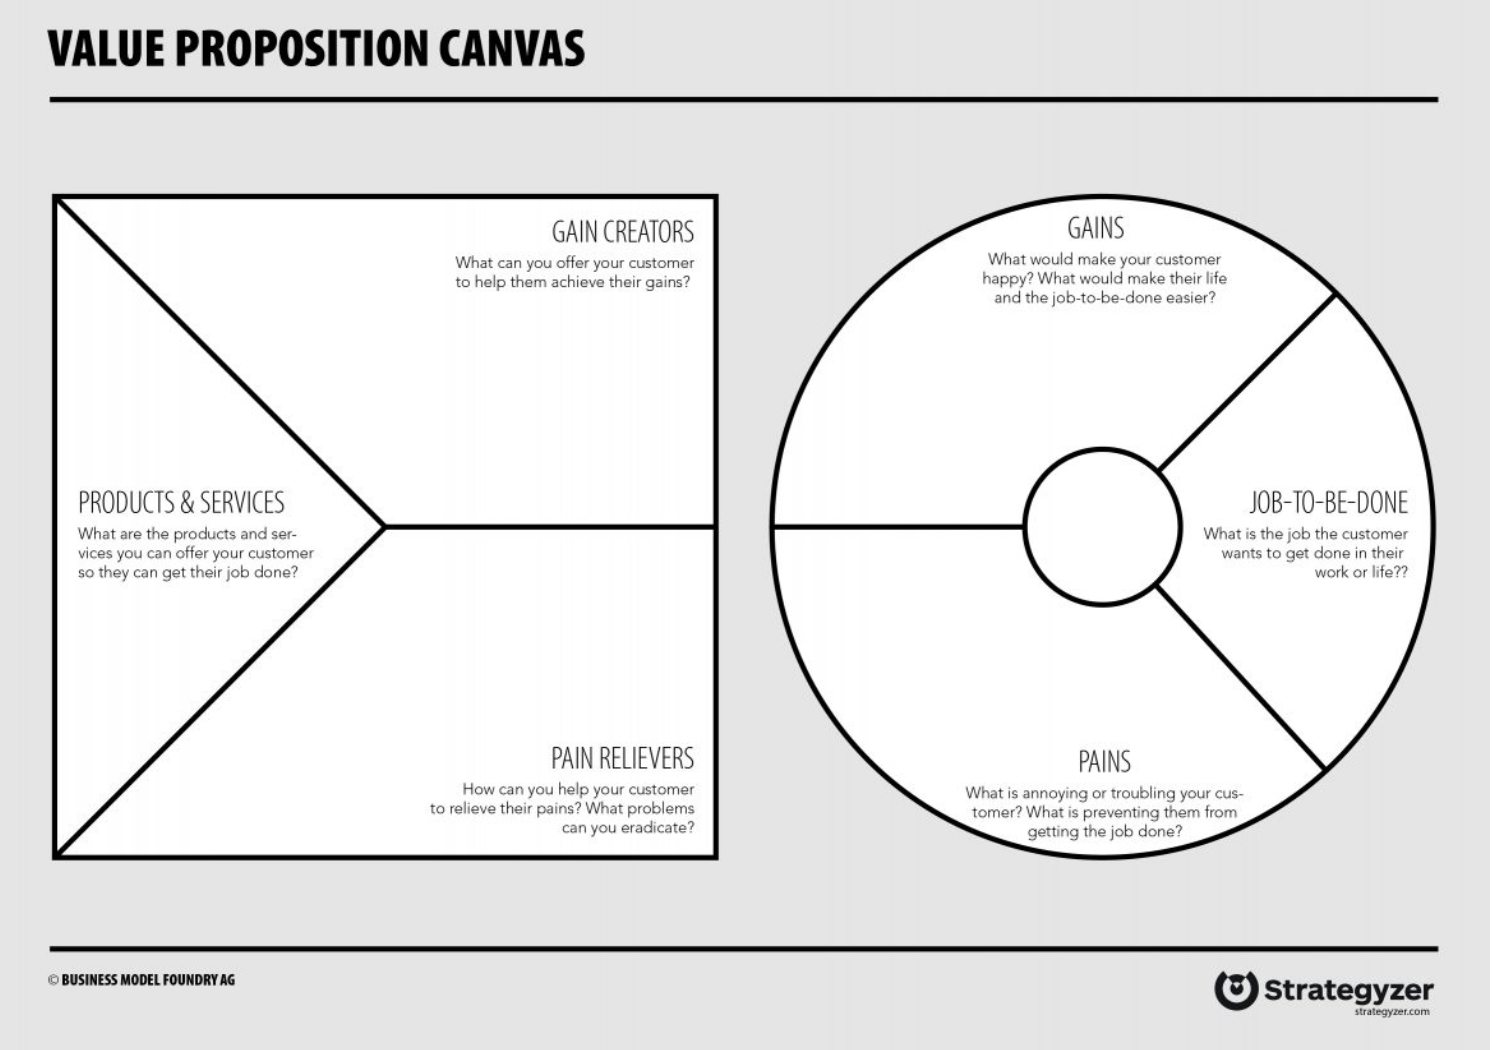
The Value Proposition Canvas is a visual framework that helps you understand if your business idea solves a real problem that customers are willing to pay for. It consists of two connected parts: one side focuses on deeply understanding your customer, and the other side maps out how your solution creates value for them.
We recommend this tool because most startups fail not because they build bad products, but because they build products that nobody wants. This canvas forces you to start with the customer rather than starting with your idea. By using this framework, you can test your assumptions before investing time and money into building something.
The canvas works by helping you visualize the relationship between what customers need and what you’re offering. When these two sides align well, you’ve found what’s called product-market fit the sweet spot where customers recognize the value you provide and are willing to pay for it.
Download the Value Proposition Canvas template here
Why Should You Use It?
Before you start building your product or service, you need to validate that there’s genuine demand for what you want to create. Many entrepreneurs fall in love with their solution and assume customers will too, but this often leads to disappointment. The Value Proposition Canvas helps you avoid this trap by putting customer needs at the center of your thinking.
This tool is particularly valuable in the early stages when you’re still testing your business concept. It helps you have structured conversations with potential customers, organize what you learn from them, and identify gaps between what customers need and what you’re planning to offer. It also makes it easier to communicate your value proposition to others, whether that’s potential customers, investors, or team members.
You’ll find this framework useful when you’re developing a new idea from scratch, when you’re struggling to explain why customers should choose you, or when you’re pivoting your business and need to validate a new direction.
Step-by-Step Guide: How to Create Your Canvas
Now let’s walk through how to actually fill in your Value Proposition Canvas. Take your time with each step — rushing through this defeats the purpose.
Step 1: Choose a Specific Customer Segment
The first decision you need to make is who exactly you’re serving. This might seem obvious, but many startups make the mistake of trying to serve “everyone” or being too vague about their target customer.
Pick one specific group of people or businesses to focus on first. You want to be precise enough that you can actually find these people and talk to them. For example, instead of targeting “small businesses,” you might focus on “independent coffee shops with 5-15 employees in urban areas” or “freelance graphic designers who have been working independently for 2-5 years.”
Different customer segments have completely different needs, problems, and desires. If you try to serve multiple segments at once, you’ll end up with a generic canvas that doesn’t resonate with anyone. Start with one segment, understand them deeply, and nail your value proposition for them. You can always create additional canvases for other segments later.
Write down your chosen segment at the top of your canvas so you keep them in mind throughout the process.
Step 2: Talk to Real Customers
This is the most important step, and it happens before you fill in anything on the canvas. You need to have actual conversations with real people from your target segment. We recommend talking to at least 3-5 people, though more is better.
These conversations should not be sales pitches. Your goal is to listen and learn, not to convince them your idea is great. You’re trying to understand their world, their challenges, and what matters to them.
During these conversations, ask open-ended questions that help you understand their daily reality. Ask them what they’re trying to accomplish in their work or life related to your business area. Ask what frustrates them about how they currently handle these tasks. Ask what would make their situation significantly better. Ask how they’re solving these problems today and what works or doesn’t work about their current solutions.
Take detailed notes during these conversations, and pay special attention to the exact words and phrases people use. Their language will help you later when you’re describing problems and solutions. If someone says they spend “way too much time on admin stuff,” dig deeper to find out exactly how much time and which specific admin tasks cause them the most pain.
These conversations will form the foundation of everything you write on the customer side of your canvas. Without real customer insights, you’re just guessing.
Step 3: Fill in the Customer Profile (Right Side)
Now open your canvas template and look at the right side. This is the customer profile, and it has three sections: Jobs, Pains, and Gains. You’ll fill this out based on what you learned from your customer conversations.
Customer Jobs are the tasks and activities your customers are trying to accomplish. These can be functional (practical tasks like “track monthly expenses”), social (how they want to be perceived, like “appear professional to clients”), or emotional (how they want to feel, like “feel confident about business decisions”). Write down 3-5 of the most important jobs your customers are trying to complete. Be specific and use language that reflects what they actually said.
Pains are the frustrations, obstacles, and negative experiences your customers face when trying to complete their jobs. These might be things that take too much time, cost too much money, create stress, or present risks. List 3-5 concrete pains, and again, be specific. Instead of writing “time-consuming,” write “spends 6 hours every week manually entering data.” Numbers and details matter because they help you later when you’re designing your solution.
Gains are the positive outcomes and benefits your customers want to achieve. What would make them happy? What would exceed their expectations? What would make their lives easier or better? Write down 3-5 gains they’re hoping for. These might include saving time, reducing costs, gaining clarity, feeling more confident, or achieving better results in their work.
As you fill in each section, try to think about which items are most important to your customers. Not all jobs, pains, and gains are equally significant, and you’ll want to focus your solution on the ones that matter most.
Step 4: Create Your Value Map (Left Side)
Now look at the left side of the canvas. This is where you describe your solution and how it creates value for the customer. The value map also has three sections: Products & Services, Pain Relievers, and Gain Creators.
Start with Products & Services. Describe what you’re actually offering, but do this in language that focuses on customer outcomes rather than technical features. Instead of saying “cloud-based SaaS platform with AI integration,” you might say “a mobile system that automatically tracks your expenses and generates financial reports.” Think about how a customer would describe what you do, not how an engineer would describe it.
Next, work on Pain Relievers. For each pain you identified in the customer profile, describe specifically how your solution addresses it. Make direct connections between the pains and your solution. If a customer pain is “spends 6 hours weekly on manual bookkeeping,” your pain reliever might be “automated transaction categorization that reduces bookkeeping to 30 minutes per week.” Be concrete about how much relief you provide.
Finally, describe your Gain Creators. For each gain the customer wants, explain how your solution delivers it. If they want “real-time visibility into business profitability,” your gain creator might be “a dashboard that updates automatically with every transaction and shows profit margins by product, by day, by week, and by month.” Show exactly how you help them achieve what they want.
The key throughout this section is to maintain clear connections between the customer side and your solution side. Every pain reliever should map to a specific pain. Every gain creator should map to a specific gain. This is how you demonstrate fit.
Step 5: Evaluate the Fit
Once both sides of your canvas are filled in, step back and look at the whole picture. Your goal is to evaluate how well your value proposition matches the customer’s needs.
Ask yourself these critical questions. Does your solution address the customer’s most intense pains, or are you focusing on minor annoyances? Do you create the gains that matter most to them, or are you delivering benefits they don’t really care about? Are there major pains you’re completely ignoring? Are there important gains you’re not helping them achieve?
Look also for elements of your solution that don’t connect to any customer job, pain, or gain. These might be features you think are cool but that don’t actually create value for the customer. Consider whether you really need them.
Finding gaps and mismatches is actually a good thing at this stage. It’s much better to discover these now than after you’ve built your product. The gaps show you where you need to adjust your solution, do more customer research, or potentially reconsider your approach.
Step 6: Test and Validate
Your canvas is filled with assumptions and hypotheses. The only way to know if you’re right is to test these ideas with real potential customers.
Take your completed canvas and show it to people from your target segment. Walk them through it and ask for their honest feedback. Does the customer profile accurately reflect their experience? Do they recognize themselves in the jobs, pains, and gains you’ve described? Would your solution actually solve their problems? Is there anything important you’re missing?
Pay attention to their reactions. If someone hesitates or seems unsure, dig deeper to understand why. If they get excited about certain aspects, note what resonates with them. If they point out problems you haven’t addressed, add those to your canvas and think about how you might solve them.
Based on this feedback, update your canvas. This is not a one-time exercise — it’s an iterative process. As you learn more about your customers and test different aspects of your solution, your canvas will evolve. That’s exactly what should happen.
Common Mistakes to Avoid
- Start from the product instead of the customer Always begin with the customer profile before defining the value map.
- Too general descriptions Be specific and concrete in your descriptions to create real insights.
- Basing the canvas on assumptions Use real customer insights from interviews and observations.
- Focus on too many customer segments at once Create separate canvases for different customer segments with distinct needs.
- Ignoring prioritization Not all tasks, pains, and gains are equally important - focus on the most critical.
What to Do Before Coming to Science Park Gotland
We want you to complete a first draft of your Value Proposition Canvas before you arrive. This preparation will make our time together much more productive because we can focus on refining your ideas rather than starting from scratch.
Here’s what you should do. First, download the canvas template from the link provided earlier in this guide. Second, identify your primary customer segment and have conversations with at least 3-5 people from that segment. Third, fill in both sides of your canvas based on what you learned. Fourth, write down any questions or uncertainties you have about your value proposition.
Don’t worry about making it perfect. The goal is to get your thinking onto paper so we can work with it together. Bring your canvas with you when you come to Science Park Gotland, and be ready to discuss what you’ve learned, what surprised you, and where you’re still uncertain.
We’ll review your canvas together during your first sessions here, help you identify the strongest and weakest parts of your value proposition, and guide you through additional testing and refinement.
Additional Learning Resources
If you want to go deeper into this framework, here are some resources we recommend.
The book Value Proposition Design by Alexander Osterwalder and his co-authors is the definitive guide to this tool. It includes many examples, templates, and detailed explanations of every aspect of value proposition development.
For a longer, more comprehensive video workshop, watch “Value Props: Create a Product People Will Actually Buy” which is about 90 minutes and goes into significant depth: youtube.com/watch?v=q8d9uuO1Cf4
Remember, the most important thing is not to read everything about this tool, but to actually use it. Start with your first draft, test it with customers, and iterate based on what you learn.